

Dicoogle on AWS
Dicoogle is an open source PACS (Picture Archiving and Communication System) platform designed for flexible and extensible medical imaging workflows. Unlike traditional PACS, Dicoogle is built with a plugin based architecture, allowing users to customize and extend its core features such as indexing, querying, storage, and web interfaces without modifying the core codebase.
Key features include:
- 📁 DICOM Storage and Query/Retrieve Services: Fully compliant with DICOM standards for receiving, storing, and retrieving medical imaging data.
- 🔍 Advanced Indexing and Search: Uses customizable indexing plugins (e.g., Lucene, MongoDB) to enable fast, full-text searches across metadata.
- 🌐 Web-Based User Interface: EOffers a lightweight, browser-accessible platform for browsing studies, previewing images, and managing data.
During my tenure as a PACS administrator, I developed a deep appreciation for the system's functionality and its ability to integrate with various platforms and technologies. This hands-on experience sparked my interest in pursuing this project, our objective is to successfully deploy and configure the application within the AWS environment.
Let’s dive in
History of PACS
- 1979: Professor Heinz U. Lemke from Germany introduced the concept of digital image communication and display
- 1982:First large-scale implementation (in USA) of PACS in 1982 at the University of Kansas
- 1993: American College of Radiology (ACR) and the National Electrical Manufacturers Association (NEMA) collaborated to create a full fledged standard called DICOM (imaging and communications in medicine)
- 2000s: Introduction of web-based PACS viewers which significantly improved accessibility and reduced hardware costs.
- 2010s: Vendor Neutral Archive (VNA) emerged to address vendor lock-in issues and provide standardized image storage
- 2020s: Cloud based PACS solutions became prominent, offering scalability and remote accessibility..
- 2025: AI integration and advanced analytics enhance the productivity and accuracy of radiologists while making PACS more accessible and cost-effective.
PACS in AWS: Build Infrastructure
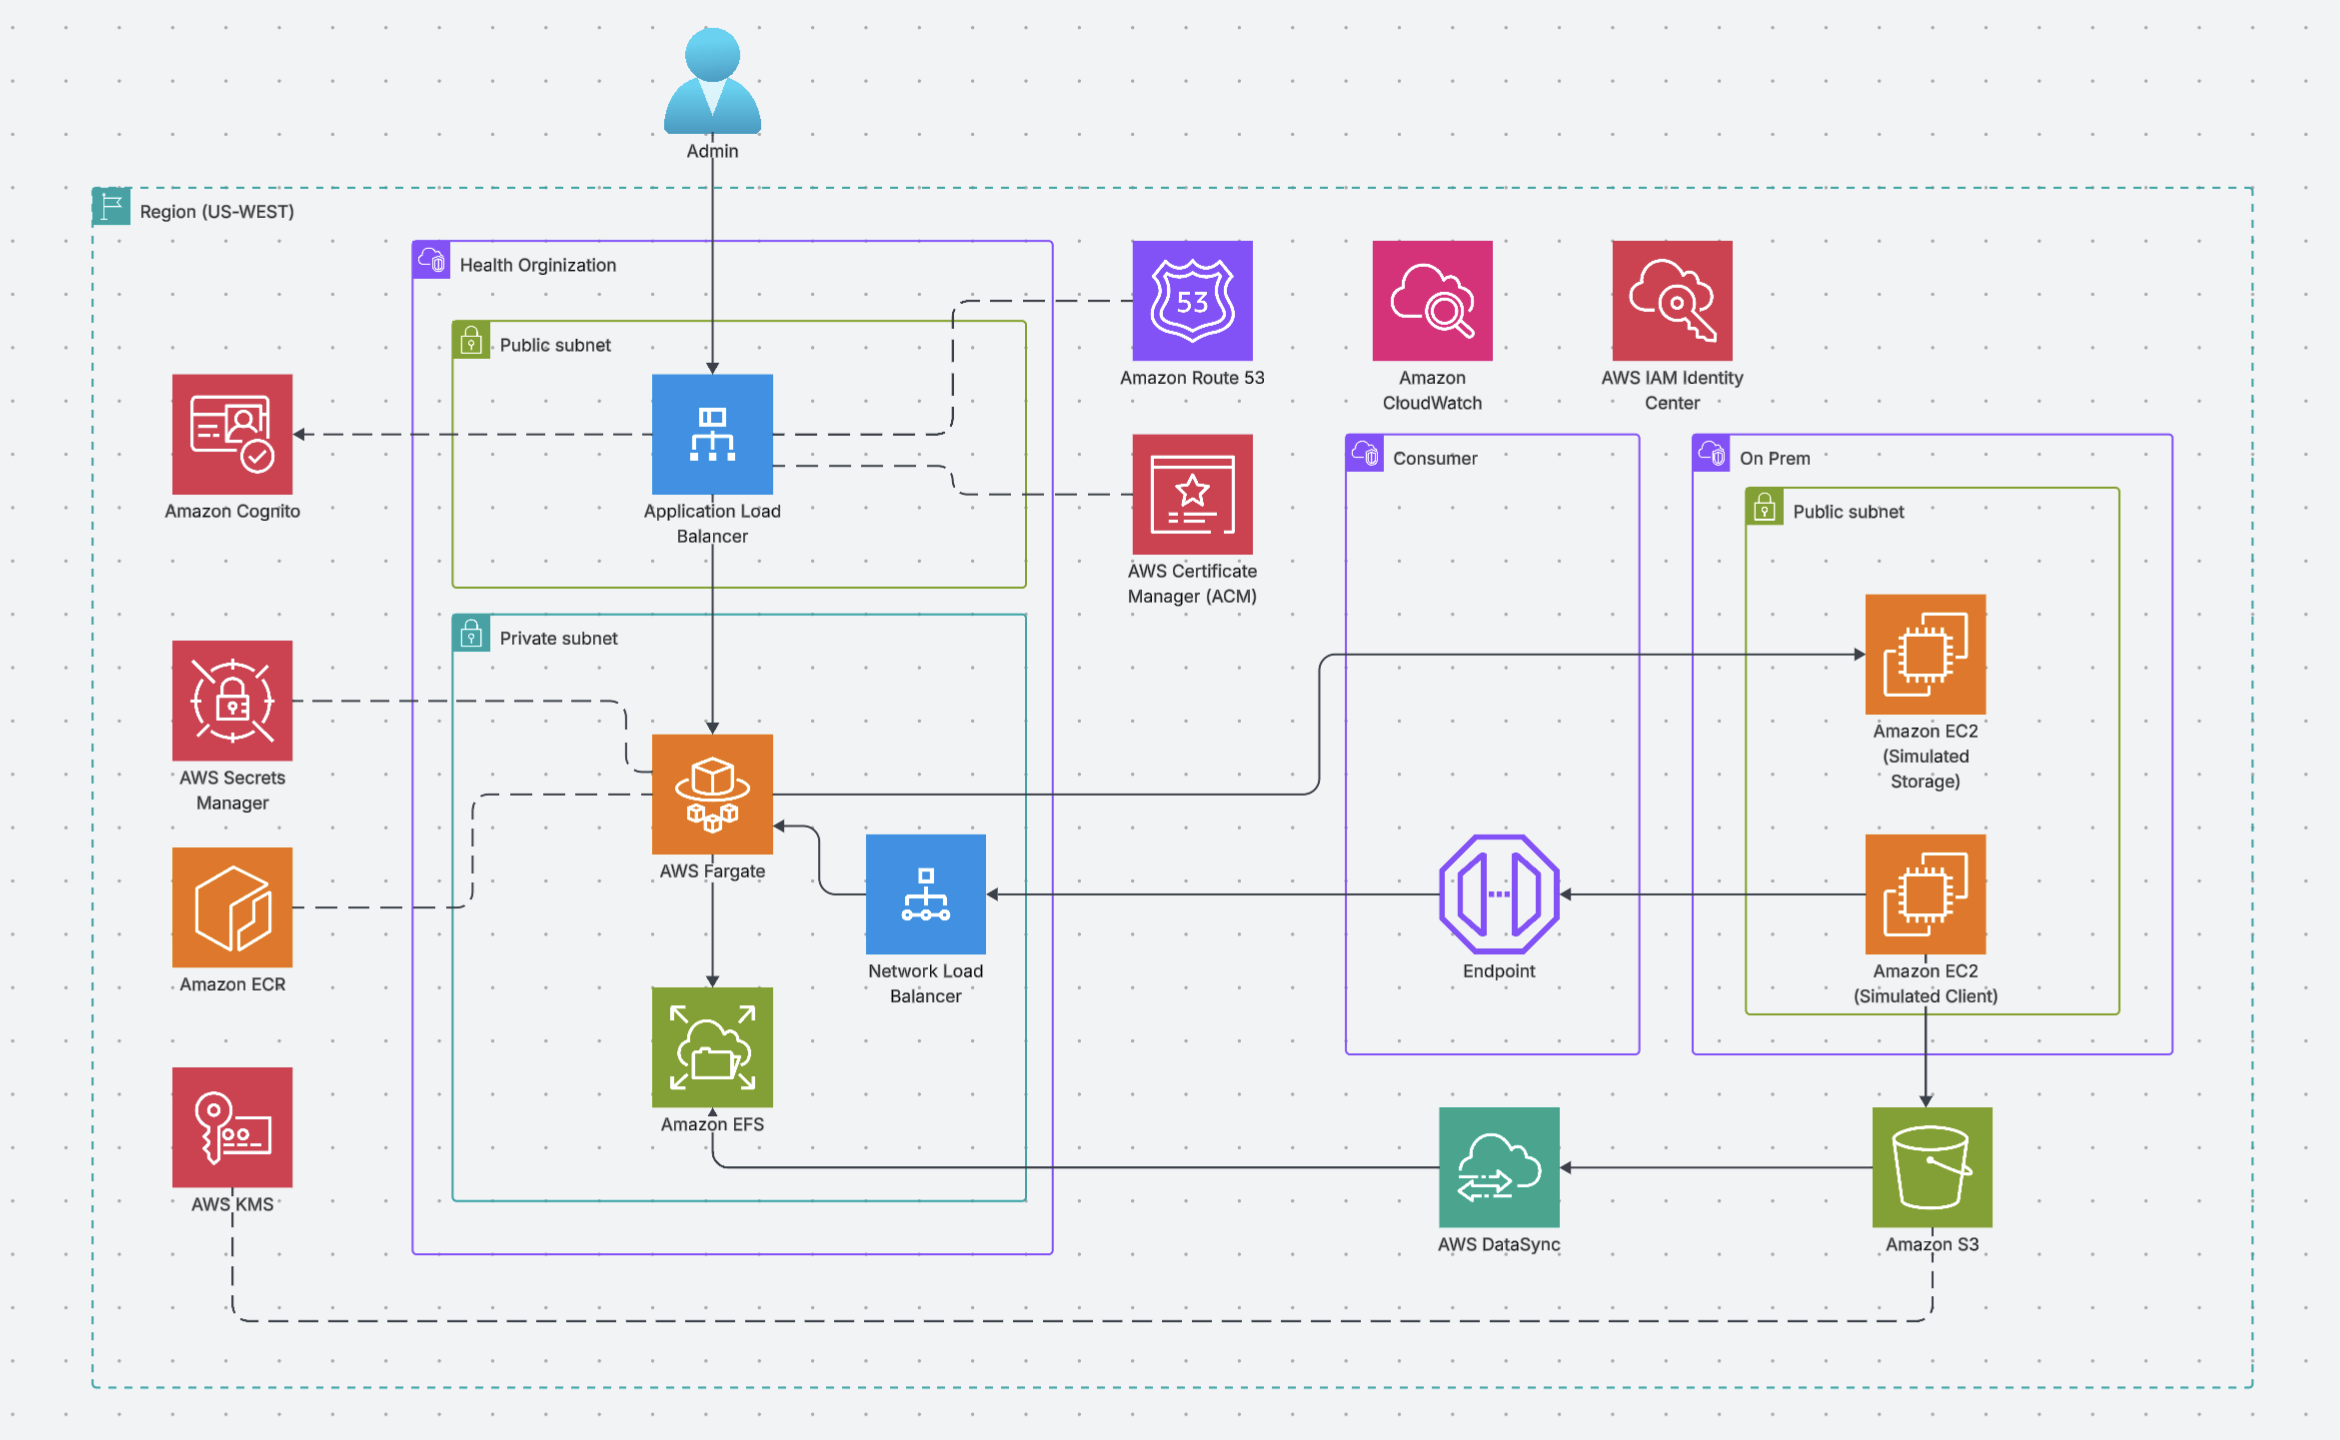
Take note of our diagram, these are the AWS components we'll leverage to bring Dicoogle to life.
- Create Group: Create a IAM group
CodeServerGroup→ Attach AWS managed policy to groupAmazonEC2FullAccess, AmazonS3FullAccess, AWSCloudFormationFullAccess, AWSDataSyncFullAccess, and SecretsManagerReadWrite - Add Inline Policies: Add the following inline policies to the group.
**AllowKMS**

"Version": "2012-10-17",
"Statement": [
	{
		"Sid": "AllowKMSCreation",
		"Effect": "Allow",
		"Action": [
			"kms:CreateKey",
			"kms:DescribeKey",
			"kms:ListKeys",
			"kms:ListAliases",
			"kms:CreateAlias",
			"kms:ScheduleKeyDeletion",
			"kms:CreateGrant"
		],
		"Resource": "*"
	}
]
**ECRPolicy** { "Version": "2012-10-17", "Statement": [ { "Effect": "Allow", "Action": "ecr:*", "Resource": "*" } ] } - Create User: We will create
Codeserveruserand add it to IAM groupCodeServerGroup - Create IDE: AWS depreciated Cloud9 on July 25, 2024; So we'll create our IDE on EC2 → Create an EC2 instance Name:
JONHNLCODESERVER→ AMI: Amazon Linux 2023 → Instance Type: T2.micro → Create a Key Pair (Save/download the private key! Key pairs are important to securely access EC2 instances. A key pair consists of a Public and Private key. These keys work together using asymmetric cryptography to authenticate users and ensure secure communication.) → Security Group: Allow HTTP and SSH traffic → Launch Instance - Modify EC2 Private Key: In the downloaded private key run
chmod 400 ~/"FILENAME".pem(This is the standard and recommended permission setting for an AWS EC2 private key file) → Now, you’ll be able to SSH from VScode or any terminal to your EC2 instance to push code. - Create Private Key for CloudFormation Run the following lines of code.
# Installs a tool called jq that helps read JSON data files.
	sudo yum install -y jq
# Creates a new security key for AWS servers and saves it to a file called dicoogle.pem.
	aws ec2 create-key-pair --key-name "dicoogle" | jq -r ".KeyMaterial" > ~/dicoogle.pem
# Makes the key file private so only you can read it (for security).
	chmod 400 ~/dicoogle.pem
- Create S3 Bucket: Store our .YAML files to this bucket. Run the following commands on the EC2 Codeserver
JONHNLCODESERVER# Creates a random 20-character string to make the bucket name unique. SUFFIX=$( echo $RANDOM | md5sum | head -c 20 ) # Creates a bucket name by combining "dicoogle-" with the random string. BUCKET=dicoogle-$SUFFIX # Creates a new storage bucket in AWS S3 with that unique name. aws s3 mb s3://$BUCKET # Displays the name of the bucket that was just created. echo “Bucket name: $BUCKET”
- Create Elastic Container Registry (ECR) repo’s Run the following commands on the EC2 Codeserver
JONHNLCODESERVER# Creates a new encryption key in AWS and saves its ID for later use. KMS_KEY=$( aws kms create-key | jq -r .KeyMetadata.KeyId ) # Creates a Docker image storage repository called "dicoogle" that's encrypted with the new key. aws ecr create-repository --repository-name dicoogle --encryption-configuration encryptionType=KMS,kmsKey=$KMS_KEY # Creates a Docker image storage repository called "nginx" that's encrypted with the same key. aws ecr create-repository --repository-name nginx --encryption-configuration encryptionType=KMS,kmsKey=$KMS_KEY # Creates a Docker image storage repository called "ghostunnel" that's encrypted with the same key. aws ecr create-repository --repository-name ghostunnel --encryption-configuration encryptionType=KMS,kmsKey=$KMS_KEY
- Download all files from GitHub repo Run the following commands on the EC2 Codeserver
JONHNLCODESERVERcd ~/environment git clone https://github.com/yojon808/AWS-Dicoogle
- Build Docker Images and Push to ECRRun the following commands on the EC2 Codeserver
JONHNLCODESERVERcd ~/environment/dicoogle/docker/dicoogle ./build.sh cd ~/environment/dicoogle/docker/nginx ./build.sh cd ~/environment/dicoogle/docker/ghostunnel ./build.sh
- Upload all .YAML files (14 total files) to S3 bucket. These .YAML files will be for CloudFormation templates. Run the following commands on the EC2 Codeserver
JONHNLCODESERVER# Changes to the "dicoogle" folder in your environment directory. cd ~/environment/dicoogle # Makes the "artifacts.sh" script file executable so you can run it. chmod 755 ./artifacts.sh # Runs the "artifacts.sh" script and passes the bucket name (created earlier) as input to the script. ./artifacts.sh $BUCKET
Create SSL's
SSL (Secure Sockets Layer) certificates provide 2 main functions. Like an ID card, it proves legitimacy. It also encrypts traffic from your browser to the website which is important if you're working with HIPPA datasets. Without SSL, sensitive information like login credentials, personal details, and payment data could be intercepted and read by unauthorized parties. In this lab we will be using self-signed certificates, for production enviorments PLEASE USE CERTIFICATES FROM A LEGIT CA (Certificate Authority).
- Change Directory "Cert" directory:
cd ~/environment/dicoogle/cert - Generate Root CA: Run the following command on the EC2 Codeserver
.openssl req -x509 -config openssl-ca.cnf -newkey rsa:4096 -sha256 -nodes -out cacert.pem -outform PEM- Uses OpenSSL to create a certificate
- Makes it a "CA" (Certificate Authority) type that can sign other certificates
- Uses settings from a config file called "openssl-ca.cnf"
- reates a strong 4096-bit encryption key
- Saves the certificate as "cacert.pem"
- Doesn't require a password (nodes = no DES encryption)
- Generate NGINX CSR: Run the following command on the EC2 Codeserver
openssl req -config openssl-nginx.cnf -newkey rsa:2048 -sha256 -nodes -out nginxcert.csr -outform PEM - Sign NGINX CSR: Run the following command on the EC2 Codeserver
openssl ca -config openssl-ca.cnf -policy signing_policy -extensions signing_req -out nginxcert.pem -infiles nginxcert.csr - Generate GHOSTUNNEL CSR: Run the following command on the EC2 Codeserver
openssl req -config openssl-ghostunnel.cnf -newkey rsa:2048 -sha256 -nodes -out ghostunnelcert.csr -outform PEM - Sign GHOSTUNNEL CSR: Run the following command on the EC2 Codeserver
openssl ca -config openssl-ca.cnf -policy signing_policy -extensions signing_req -out ghostunnelcert.pem -infiles ghostunnelcert.csr - Generate Client EC2 CSR: Run the following command on the EC2 Codeserver
openssl req -config openssl-client.cnf -newkey rsa:2048 -sha256 -nodes -out clientcert.csr -outform PEM - Sign Client EC2 CSR: Run the following command on the EC2 Codeserver
openssl ca -config openssl-ca.cnf -policy signing_policy -extensions signing_req -out clientcert.pem -infiles clientcert.csr - Generate Storage EC2 CSR: Run the following command on the EC2 Codeserver
openssl req -config openssl-storage.cnf -newkey rsa:2048 -sha256 -nodes -out storagecert.csr -outform PEM - Sign Storage EC2 CSR: Run the following command on the EC2 Codeserver
openssl ca -config openssl-ca.cnf -policy signing_policy -extensions signing_req -out storagecert.pem -infiles storagecert.csr - Create Entries in Secrets Manager.:
chmod 755 ./secrets.sh
./secrets.sh
Deploy
For this to work you'll need a PUBLIC HOSTED ZONE in Route53. Most public domains cost $15/year. Private hosted zones will NOT work. Once we have our Public Hosted Zone we can start to deploy Dicoogle in CloudFormation.
- Configure CloudFormation: Go to CloudFormation console → "Create stack" → Choose our S3 bucket and use "dicoogle-main-template.yaml" → Click "Next" → Provide Stack Name: "JONHNL-Dicoogle" → See below for parameters
- KeyName: From the dropdown select our "dicoogle" key
- S3BucketName: Bucket name should look like this "dicoogle-07f33###############"
- DicoogleImage: URI found in ECR Private Repository
- NginxImage: URI found in ECR Private Repository
- GhostunnelImage: URI found in ECR Private Repository
- NginxCert/NginxKey: ARN located in secrets manager
- GhostunnelCert/GhostunnelKey: ARN located in secrets manager
- CACert: ARN located in secrets manager
- DomainName: Our Public Domain found in Route53
- HostedZone: From dropdown select out HostedZone ID
- AvailabilityZones: Select 2 AZ's within your Region
- Contain default value. Input is optional: Keep default.
- Configure stack options Click "Next"
- Review and create Select the two checkboxes, then "Create stack". This should take 15 to 20 minutes to create.
To Be Continued
Next we will cover How to test bulk upload images to Dicoogle, How to test indexing uploaded images, How to test C-FIND and C-MOVE, and How to clean up the deployed solution.
Stay Tuned!
References
- Running Dicoogle, an open source PACS solution, on AWS (part 1) by Forrest Sun
- Running Dicoogle, an open source PACS solution, on AWS (part 2) by Forrest Sun
- Building a Scalable DICOM Ingestion Pipeline for AWS HealthImaging with CitiusTech by Aditya Kanekar and Adam Kielski
- Integration of on-premises medical imaging data with AWS HealthImaging by JP Leger and Priya Padate
- Introducing AWS HealthImaging — purpose-built for medical imaging at scale by Tehsin Syed and Andy Schuetz
- Philips uses AWS ML to improve healthcare interoperability by Shawn Stapleton and Randal Goomer
- Short history of PACS. Part I: USA by H.K. Huang