1. SOAP (Simple Object Access Protocol)
What: XML-based, secure, reliable.
Best for: Financial services.
Avoid if: You need lightweight APIs.

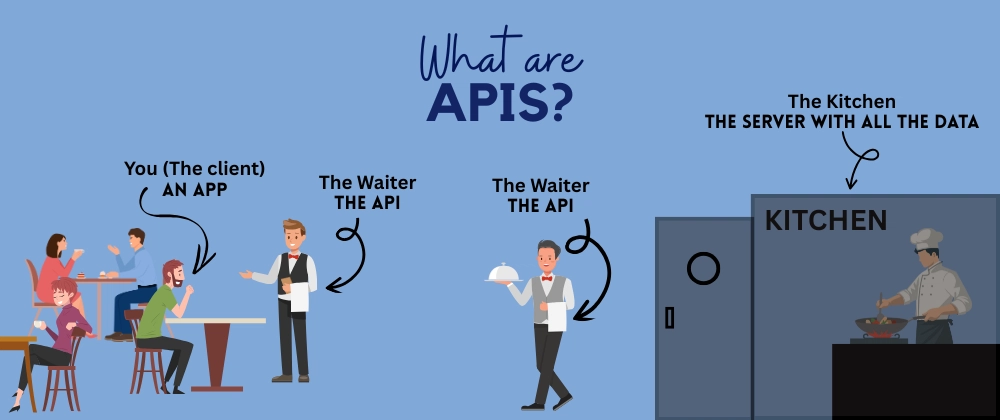
Application Programming Interfaces (APIs): Act as a bridge between different software applications, enabling them to communicate, exchange data, and share functionality efficiently.
APIs foster innovation by providing standardized ways to access features like geolocation, payments, or social logins. Businesses can deliver richer user experiences more quickly.
AWS API Gateway is a fully managed service for creating, publishing, maintaining, monitoring, and securing REST, HTTP, and WebSocket APIs at any scale. It serves as a "front door" for applications to connect with backend services such as Lambda, EC2, ECS, or web apps.
What: XML-based, secure, reliable.
Best for: Financial services.
Avoid if: You need lightweight APIs.
What: HTTP-based, widely adopted.
Best for: Most web services.
Avoid if: Complex relationships or real-time updates are needed.
What: Query language, flexible data fetching.
Best for: Complex, interconnected data.
Avoid if: You want simple requests without overhead.
What: High-performance, uses Protocol Buffers.
Best for: Microservices where speed matters.
Avoid if: You need broad browser support.
What: Real-time, two-way communication.
Best for: Chat, gaming, dashboards.
Avoid if: Request-response is enough.
What: Event-driven callbacks.
Best for: Notifications & integrations.
Avoid if: You need synchronous responses.
JONHNL-Function → Runtime: Python 3.13 (Use any langauge that you're comfortable with). → Architecture: x86_64. → Create function → Give it 1 to 2 minutes to create
import json

def lambda_handler(event, context):
	# Sets "World" as the default name, in case no input is given.
	name = "World"
	#If the request includes query parameters, it looks for "name".
	if event.get('queryStringParameters'):
		name = event.get('queryStringParameters').get('name', name)

	#Friendly message with the chosen name.  A "status": "success" field.
	response_data = {
		"message": f"Hello, {name}! Your request was successful.",
		"status": "success"
	}
	#Returns a valid API Gateway Lambda Proxy Integration response:
	return {
		"statusCode": 200,
		"headers": {"Content-Type": "application/json"},
		"body": json.dumps(response_data)
	}
test → Aside from the name, keep all Default settings and Create.We are able to a web browser to test GET request you'll need to ese Postman to validate POST, PUT, PATCH requests that require payloads (Download Postman here). It is also worth noting in AWS API Gateway you'll notice "Stages". In our lab we are working with 1 Stage where "Automatic Deployment" is enabled. Think of Stages as different enviorments for your APIs. Automatic Deployment on the other hand will use the latest integration that is mapped to the route. When you start to have multiple APIs you'll want to segment these out. In a real enviorment its a good idea to have atleast Dev, Test, and Production Stages.
API Gateway passes the full request to Lambda. Flexible, but Lambda must handle everything. We created this in our first tutorial.
API Gateway maps the request before sending to Lambda. Cleaner for strict contracts, but requires VTL mapping templates. Lets build a Non-Proxy function.
Non-Proxy-Function, Runtime: Python 3.13.
import json

def lambda_handler(event, context):
	# 1. Try to pull "name" directly from the event
	name = event.get ('name')

	# 2. If "name" wasn't found at the top level,look for it inside query string parameters
	if not name:
		params = event.get('queryStringParameters', {})
		# Default to "World" if still not found
		name = params.get ('name', 'World')

	# 3. Return an HTTP response
	return {
		"statusCode": 200,
		"body": f"Hello, {name}!"
	}
{"name":"JONHNL"}.non-proxy-api → Create Resource → POST method → Attach Lambda (non-proxy).name query param.
#set($originalParam = $input.params('name'))
#set($prefix = "non_proxy_")
#if(!$originalParam.startsWith($prefix))
#set ($originalParam = $prefix + $originalParam)
#end
{
	"name": "$originalParam"
}
name param.There are a couple of things we should cover. 1. When should we use non-proxy APIs? When you want to integrate with legacy systems or AWS services directly or when you need API Gateway to do transformation work, instead of pushing it into your backend code. 2. Velocity Template Language (VTL), t’s a lightweight scripting language used in API Gateway mapping templates. It reshapes data going into or out of your API.
AWS API Gateway has a feature called Validators, which can only be used for REST APIs. While HTTP APIs offer advantages like being lighter and 71% less expensive than REST APIs, they lack support for request validation. Request validators in API Gateway (REST APIs) let the gateway reject bad requests before they hit your backend. For example, if you want to pass information that requires and email address and a phone number we'll use a validator to valid the format is correct before passing it to the backend.
validator-api → Create APIvalidator-api-resource → Create resource
{
	"$schema": "http://json-schema.org/draft-04/schema#",
	"title": "RequestModel",
	"type": "object",
	"required": ["name", "email", "mobile-number"],
	"properties": {
		"name": { "type": "string", "minLength": 1 },
		"email": { "type": "string", "format": "email" },
		"mobile-number": { "type": "integer", "minimum": 1000000000, "maximum": 9999999999 }
	},
	"additionalProperties": false
	}
"name": "JONHNL"
"email": "jon@JONHNL.com"
"mobile-number": "7778889999"

You’ve now built both Proxy, Non-Proxy API, created a validator and authorizer in AWS using Lambda and API Gateway!